Build a Telegram bot in PHP
19th January 2021 | 14 minutes
Telegram is one of the two cool kids on the messaging app market right now. Especially since the recent upset with WhatsApps new data sharing policy the user numbers have positively skyrocketed. There's now over 500 million people using the app.
Personally I've been using it since 2015. Since 2018, I've used it for 95% of my daily communication. During that time I also found out that Telegram has a really cool Chat Bot API! So I've built a few.
- One keeps track of my appointments and sends reminders
- One tracks shipping goals for a chat group of my friends
- One that checked who in the group got made fun of the most
- One that tracks some metrics of my company (audience growth, ...)
Today, I'd like to teach you how to do the same. Because a future where we all have a personal army of automated chat robots is definitely one I want to live in!
Prerequisites
To follow along with this article you'll need only two things.
- A working installation of PHP 7.2+ and Composer
- The Telegram app and an account
To create our bot, we need a special token from Telegram itself. We can get this from an automated bot, too! It's called @BotFather and it will guide you through the setup process. So let's do that now!
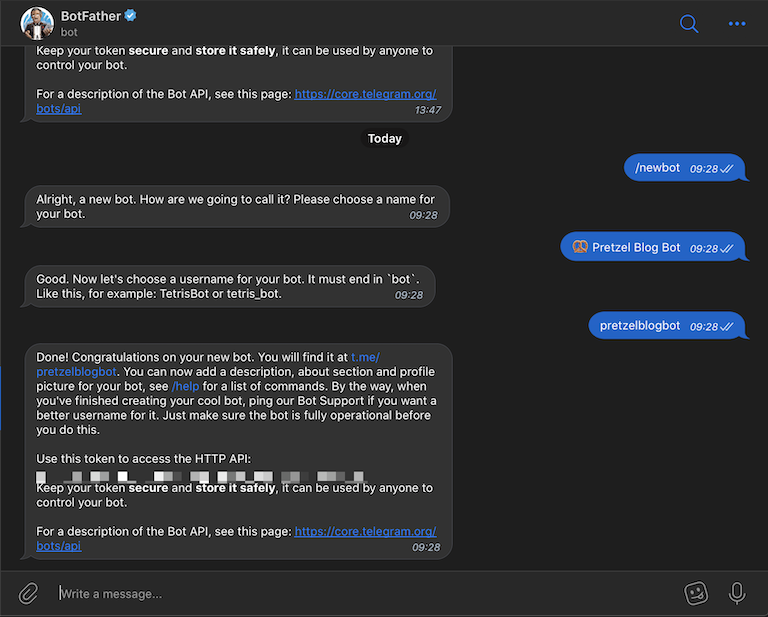
Congratulations! You have set up your first Telegram bot. Be sure to note down that token from the last message. We'll need it in a few minutes. You can also further customize your bot with a profile image and such. I'll leave that up to you.
Setting up your PHP project
Now it's time to get down to the actual core of this project: Implementing the chat bot.
We'll start as with any good PHP project in $CURRENT_YEAR: By setting up a Composer project.
$ composer init
While we could directly deal with the HTTP API of Telegram, there is a very nice library already built for us by Irfaq Sayed. So let's grab that too!
$ composer require irazasyed/telegram-bot-sdk
For any Laravel fans: This library also provides a facade. Super neat!
Then it's time to define our directory structure. When I build Telegram bots, I generally follow a structure that looks like this:
chat-bot/
├─ composer.json
├─ composer.lock
├─ vendor/
├─ src/
├─ public/
├─ .env
├─ bootstrap.php
├─ helpers.php
├─ setup.php
First we have our regular files as generated by Composer.
src/ is the folder where we place all of our commands and other application-specific code.
public/ will contain the code we expose to the scary, scary reality of the internet.
bootstrap.php will set up some things such as including our autoloader
and loading variables from our .env file. We'll include that one a lot.
helpers.php usually contains small utility functions that don't fit anywhere else.
Last but not least, setup.php is a small file that helps us set up our connection with Telegram.
Now would be a good time to copy that token we got from BotFather earlier and put it in our .env file.
# .env
TELEGRAM_BOT_TOKEN="1234567890:YOUR_TOKEN"
You can name it whatever you like. My chosen name is just the default of the library.
To wrap up this setup sequence all that's left to is to set up our autoloader. To do this we modify our
composer.json and add this:
"autoload": {
    "psr-4": {
        "Pretzel\\": "src/"
    },
    "files": [ "helpers.php" ]
}
Again, the namespace can be whatever you prefer. Doesn't have to be self-centered.
The change essentially summarizes to this: Load everything from src/ into the Pretzel namespace,
and please also load the helpers.php file specifically.
Now we finally have our PHP project ready to go!
Setting up the connection with Telegram
Telegram works with an event-based system to let you know when new updates arrive. For this purpose we need to set up a webhook handler. In real world terms this just a PHP file that Telegram sends a request to every time somebody messages our bot. Fancy!
First, we'll need our bot's token. That is how we identify to Telegram who we are. As you may remember
we put that into a .env file. So let's set up loading variables from that.
$ composer require vlucas/phpdotenv
Then we add the following to our bootstrap.php
// bootstrap.php

<?php

require __DIR__ . "/vendor/autoload.php";

$dotenv = Dotenv\Dotenv::createImmutable(__DIR__);
$dotenv->load();
Thanks to that short and sweet snippet we can now easily grab values from our .env file by using the
env() function. This is not a native PHP function, but the Telegram Bot SDK brings it along as a dependency.
Next, I want to set up a small helper function in our helpers.php
// helpers.php

<?php

function telegram(): \Telegram\Bot\Api
{
    return new \Telegram\Bot\Api(
        env('TELEGRAM_BOT_TOKEN')
    );
}
This is purely for convenience. It allows us to grab an instance of the Telegram API wrapper without
constantly having to query the .env file again. Now we can combine those two things in our setup.php file.
// setup.php

<?php

require 'bootstrap.php';

telegram()->setWebhook(['url' => env('TELEGRAM_WEBHOOK')]);

echo "Setup the Telegram webhook!";
Stuff like this is why the telegram() helper is useful
Hold your horses. Readers with sharp eyes will have noticed, that I'm getting a TELEGRAM_WEBHOOK
from the .env file. We don't have that yet, right? Right.
We need to pass Telegram some kind of URL it can send its updates to. How do we do this on localhost?
I'm glad you asked. Being a PHP developer in 2021 is a wonderful experience, so we have the perfect tool for
this. It's called expose and it's made by BeyondCode.
Note: There are other options out there too. Something like ngrok would work just as well. I like expose because it's easy to set up and provides custom subdomains for free.
Setting up your local webhook
To get started with getting an URL for our local environment, first we install expose.
$ composer global require beyondcode/expose
This installs the expose utility globally and gives us access to it. If you've been
using Composer for a while you've probably already done that, but make sure that composer global config bin-dir --absolute
is in your $PATH.
Next we need to run our PHP somehow. For a project such as this the integrated PHP web server is fine. So we can use the following in the root directory of your project to get it running:
$ php -S localhost:8080 -t public

[Mon Jan 18 11:28:18 2021] PHP 8.0.0 Development Server (http://localhost:8080) started
Then, open another terminal tab and run the following:
$ expose share localhost:8080 --subdomain=pbbot
The subdomain option can be any of your choice. You can even name it "hunky-dory"
In the resulting output towards the end you should find a URL ending in sharedwithexpose.com.
In my case it is pbbot.sharedwithexpose.com and that is the URL we need. Remember it!
Making it more ergonomic (optional)
Running two different terminal tabs at once is cumbersome. So let's make use of ✨magical Composer scripts✨
so we only have to run one command to get our bot up to speed. We can make use of the & functionality of
the shell to run both things at the same time. So you can add this to your composer.json
"scripts": {
    "dev": "php -S localhost:8080 -t public &>/dev/null & expose share localhost:8080 --subdomain=pbbot"
}
Adjust the subdomain and port to your liking.
The &>/dev/null stuff just ensures that the output of the original PHP web server does not mess with
expose. Since expose gives us a nice request overview, we don't need it anyways. Now you can run
a single command, and your bot comes alive!
$ composer run dev
Now we can add our webhook URL to our .env file
# .env

TELEGRAM_BOT_TOKEN="1234567890:YOUR_TOKEN"
TELEGRAM_WEBHOOK="https://pbbot.sharedwithexpose.com/webhook.php"
Note that the URL *must* be HTTPS. Security and all that.
webhook.php will be the file we use to handle any incoming requests from Telegram. We'll create it in
the next step. First, we want to run our little setup.php script.
$ php setup.php
Setup the Telegram webhook!
Great success!
Setting up your webhook handler
So we just told Telegram to please send us any information to webhook.php, but we don't have that file yet.
We'll just create it in our public/ folder. The webhook handler is essentially responsible for grabbing
any unprocessed updates, forwarding them to our bot, and returning a result to Telegram. It looks like this:
// public/webhook.php

<?php

require __DIR__ . '/../bootstrap.php';

telegram()->commandsHandler(true);
I think by now you can see why the Telegram Bot SDK is useful. The fact that we have to call only one function to set up an entire command system is super useful and keeps productivity high!
Writing your first command
Now that we have all the annoying setup stuff out of the way, we can write our first command.
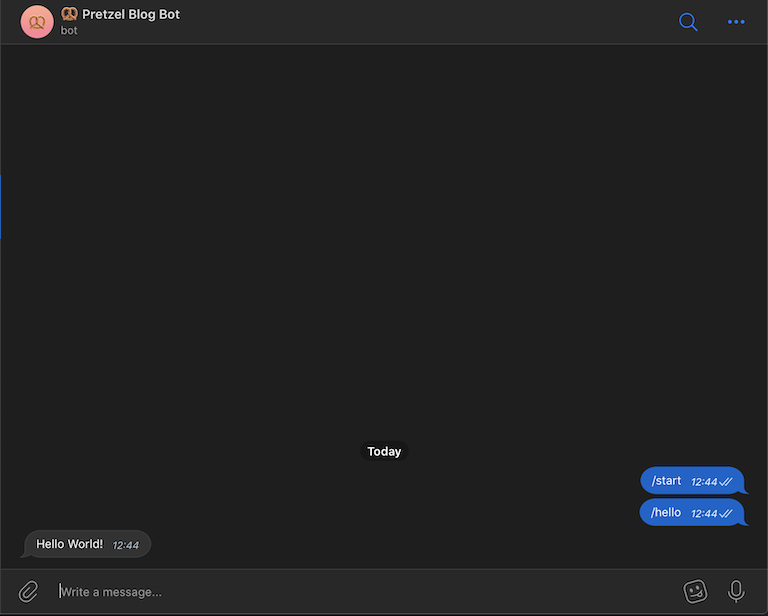
Let's start with the most bare-bones command imaginable: When we say /hello to our bot, we want it to
say Hello World back to us.
First, we have to create a new class for our command. I'll put it in src/Commands/HelloCommand.php, so
we can access it through the class Pretzel\Commands\HelloCommand. Every command we create needs to inherit
from the Bot SDKs base class. It also needs to have a name. So the basic structure looks like this.
// src/Commands/HelloCommand.php

<?php

namespace Pretzel\Commands;

use Telegram\Bot\Commands\Command;

class HelloCommand extends Command
{
    protected $name = 'hello';

    public function handle()
    {
        // TODO: Implement command
    }
}
Now inside the handle() function, we have access to a whole bunch of replyWith* type functions
that we can use to respond to the message we just received. The easiest way is to use replyWithMessage.

These functions all take a bunch of arguments in the form of an array. I can't even tell you all of them by heart. Thankfully, there's good documentation! To find out what you need to send to the function, you can just look it up in the API Methods documentation. I also highly recommend the official Telegram documentation for more detailed information.
Each send* function corresponds to one of our replyWith* functions.
The important thing that these replyWith* functions do is adding the chat_id parameter to our arguments.
So we can safely ignore that one. The other parameter we need is text. It should contain, as the name implies,
the text of our message.
So now our class should look something like this
// src/Commands/HelloCommand.php

<?php

namespace Pretzel\Commands;

use Telegram\Bot\Commands\Command;

class HelloCommand extends Command
{
    protected $name = 'hello';

    public function handle()
    {
        $this->replyWithMessage([
            'text' => 'Hello World!'
        ]);
    }
}
This would be an amazing use case for named arguments from PHP 8!
Registering it with the bot
Now we need to register this command with the bot, so it actually knows what commands are available.
To do this, we go back to our bootstrap.php file and add the following
// bootstrap.php

telegram()->addCommands([
    Pretzel\Commands\HelloCommand::class,
]);
The namespace of your command is of course different
And now that we have done this, we can interact with our bot! Open up the chat with your bot in Telegram
and try sending it a /hello command. It should respond to you right away!
Working with arguments
Of course, commands are much more interesting when you're able to send arguments to them. Say we want to greet a friend! How do we pass in their name?
For this, the Command class we inherit from offers a $pattern property. Here we can either use
named arguments in braces like {this}, or we can pass in a custom regex.
// src/Commands/HelloCommand.php

class HelloCommand extends Command
{
    protected $pattern = '{name}'; // Our argument is called 'name'
    protected $pattern = '{name}?'; // We have an optional argument called 'name'
    protected $pattern = '.+' // We'll take in any argument with 1 or more characters. It'll be called 'custom'

    // .. SNIP ..
}
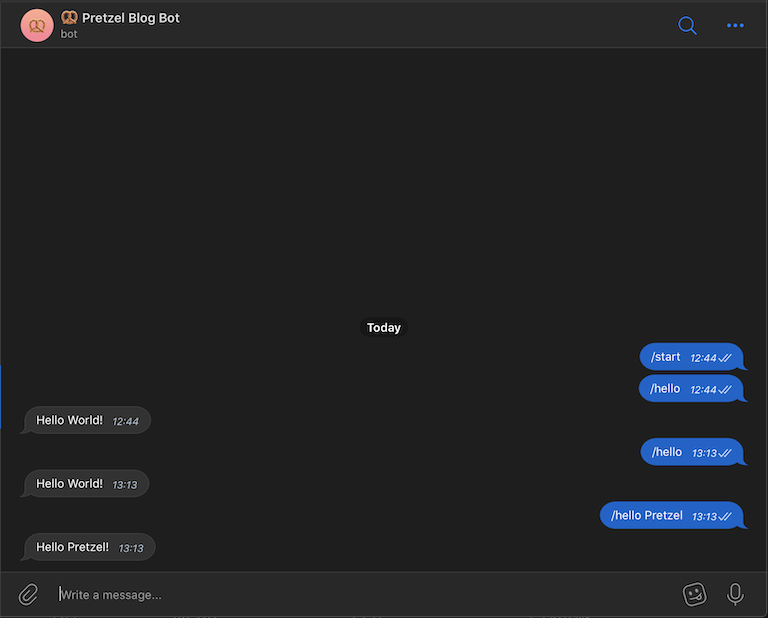
So let's say we want our bot to greet a person by their name if it receives one. Else we just greet the world,
because everyone should be greeted once in a while. For this we set our $pattern to {name}?.
Then, in our handle() function we can just grab the pre-supplied $arguments property:
// src/Commands/HelloCommand.php

<?php

class HelloCommand extends Command
{
    protected $name = 'hello';
    protected $pattern = '{name}?';

    public function handle()
    {
        $arguments = collect($this->arguments);

        // .. SNIP ..
    }
}
As you can see, I used a the collect function when getting the arguments. This is another beautiful thing
from the Laravel world and brought along by the Bot SDK. Collections are basically super-powered PHP arrays
with a much cleaner way of working with them.
Of course you can also just handle the $arguments array yourself, but I vastly prefer this approach.
To learn more about Laravel collections, you can read the excellent documentation. They're available as a standalone package and are a massive quality-of-life improvement.
Now we can grab the name key from our arguments, or return a default value if it's not there. Then
we insert this argument into a string and send it back to the user. That looks like this
// src/Commands/HelloCommand.php

<?php

class HelloCommand extends Command
{
    protected $name = 'hello';
    protected $pattern = '{name}?';

    public function handle()
    {
        $arguments = collect($this->arguments);

        $this->replyWithMessage([
            'text' => sprintf(
                'Hello %s!',
                $arguments->get('name', 'World')
            )
        ]);
    }
}
After saving our command we can try it immediately! Go over to your bot and send it /hello <YOUR_NAME>
and watch as it greets you with it's mechanically engineered happiness!
Sending unprompted messages
Of course bots only have limited use if they only reply to you when you ask for them. Luckily, we can also
send messages without any prior command. Just because we feel like it. For this, we need the chat_id of
the person we want to send the messages to, or the @username of the group we want to send messages to.
To find out your personal chat_id you can just contact @RawDataBot, who will
tell you in the first message.
If you have a private group without a @username, you can also just add @RawDataBot to the group to find the
chat_id of the group. It will be a negative number.
And then you can use the sendMessage function of the Telegram API object. As demonstration, let's add an
unprompted message to our setup.php that we successfully set up our webhook.
// setup.php

<?php

require 'bootstrap.php';

$telegram = telegram();
$telegram->setWebhook(['url' => env('TELEGRAM_WEBHOOK')]);
$telegram->sendMessage([
    'chat_id' => env('PRETZELHANDS_CHAT_ID'),
    'text' => 'Successfully set up webhook'
]);
That was pretty easy, wasn't it?
Processing raw messages without commands
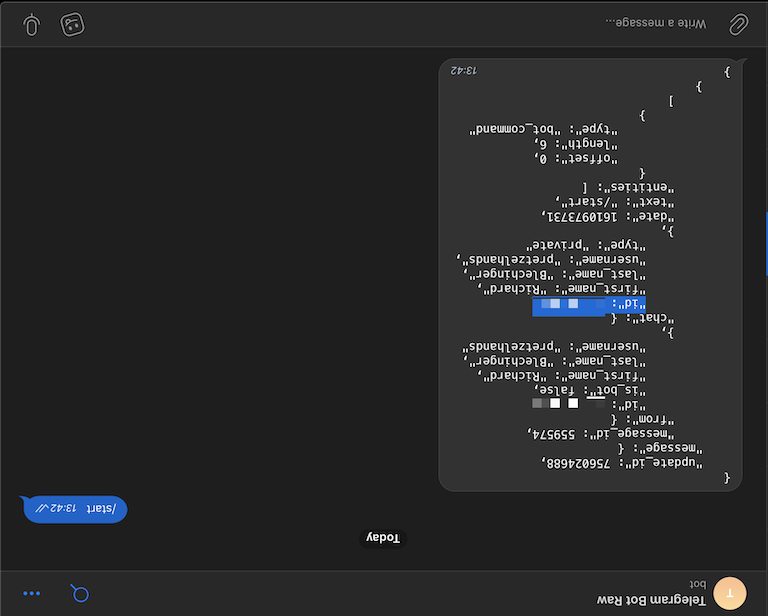
For some bots, we may want to process messages that are sent without command, just using the raw information that Telegram provides us. This is once again, relatively easy. After passing through the commands system, the SDK gives us an update object in the webhook handler. We can then use that to do whatever!
// public/webhook.php

<?php

<?php

require __DIR__ . '/../bootstrap.php';

$updates = telegram()->commandsHandler(true);

// Telegram\Bot\Objects\Update Object(
//     [items:protected] => Array(
//         [update_id] => 290647531
//         [message] => Array(
//             [message_id] => 81
//                 [from] => Array(
//                 [id] => 0000000000
//                 [is_bot] =>
//                 [first_name] => Richard
//                 [last_name] => Blechinger
//                 [username] => pretzelhands
//                 [language_code] => en
//             )
//
//             [chat] => Array(
//                 [id] => 00000000000
//                 [first_name] => Richard
//                 [last_name] => Blechinger
//                 [username] => pretzelhands
//                 [type] => private
//             )
//
//             [date] => 1610977759
//             [text] => abc
//         )
//     )
// )
All properties on this update are directly accessible. So you can use $update->message->text to grab
the relevant messages text etc.
This is the process I used in another bot to parse date and event information directly from a users message. Aside from the fact that parsing natural language dates is painful, it works great!
Deployment
Deployment for this setup should be straightforward for anyone who has ever dealt with other PHP deployments before. Doing so is left as an exercise for the reader, but it boils down to three points
- Push your files onto your server
- Point your webserver to serve files from
public/ - Update webhook URL to
yourdomain.com/webhook.phpusingsetup.php
After that you're good to go!
Closing thoughts
This article should have given you enough of an overview to get started with writing your own Telegram bots for whatever purposes. From here on out, the possibilities are mostly limited to what you can imagine.
My main bot currently tracks newsletter growth, Twitter growth, and during Notebag's lifecycle it tracked the daily amount of money earned. It's like a little daily dashboard informing me how my side-project life is going. The second bot makes sure I show up to any appointments I have on time.
The code for this project is also available on GitHub